Breadcrump: Development > How To's
Submenu for navigation on the (parent)page:
github repository aus dem Bestand klonen
23. Juni 2020
#cd ~/PhpstormProjects
git clone git@SSH-ACCOUNT-NAME:githubname/repository.git
cd repository
#tell me who you are
git config user.email "github@example.com"
git config user.name "mustermann"
#work on your files and then push it
git add .
git commit -m "a commit to see what happend"
git push -u origin master
github ssh-keys, auch für mehrere Accounts
20. November 2019
Bei z.B. Cinnamon übernimmt der ssh-agent die keys unter ~/.ssh/ automatisch. Das verhindert jedoch den Zugriff aus dem Dateimanager (Nemo) heraus von SFTP-Benutzern auf SFTP Server. Deshalb die keys an anderer Stelle speichern z.B. in ~/.ssh/git/
# einen extra Ordner für die neuen keys anlegen
mkdir ~/.ssh/git

# keys erzeugen und in neuem Ordner speichern
ssh-keygen -t rsa -b 4096 -C "test@example.com"
Generating public/private rsa key pair.
Enter file in which to save the key (/home/user/.ssh/id_rsa): /home/user/.ssh/git/account-one-git_id_rsa

# public key ausgeben und bei github hinterlegen
# dort auch gleich repository für einen Test anlegen, z.B. keytest
cat ~/.ssh/git/account-one-git_id_rsa.pub

# ssh config bearbeiten und host mit Pfad zum IdentityFile anlegen
# HostName und User bleiben immer gleich
nano .ssh/config

Host account-one-git
        HostName github.com
        User git
        IdentityFile ~/.ssh/git/account-one-git_id_rsa

# ssh Aufruf testen
ssh -T account-one-git

# neues lokales repository erstellen
cd Schreibtisch
mkdir test
cd test
git init
git config user.email "you@example.com"
git config user.name "Your Name"
touch test.txt
git add *
git commit -m "first commit"
beim Hinzufügen der remote Adresse die url austauschen, also statt
git@github.com:githubname/keytest.git
git@account-one-git:githubname/keytest.git
# remote adresse hinzufügen
git remote add origin git@account-one-git:githubname/keytest.git
# pushen
git push -u origin master
mit weiteren Accounts genauso verfahren und Namen anpassen
Plenty checkout
15. Oktober 2019
- alle Plugins updaten
- https://knowledge.plentymarkets.com/webshop/best-practices#individueller-bestellvorgang
- Routen, wie beschrieben, aktivieren
- Kategorie login erstellen, auf URL achten
- Kategorie checkout erstellen, auf URL achten
- Backlinks, wie beschrieben, einfügen
{% if ( $CustomerID ) { Link_Checkout(3); } else { Link_Checkout(2); } %}
ersetzen durch
$_check.$_backlink
und darüber hinzufügen
{% if( $CustomerID ) %}
	{% $_check = Link_Checkout(3); %}
	{% $_backlink = ''; %}
{% else %}
	{% $_check = Link_Checkout(2); %}
	{% $_backlink = '?backlink='; %}
	{% if $Lang !== 'de' %}
	  {% $_backlink = $_backlink . '/' . $Lang; %}
	{% endif %}
	{% $_backlink .= '/checkout'; %}
{% endif %}
gilt für:
- Artikel -> Kategorien -> (Bestellen) Warenkorb, dort in der Beschreibung 1
- CMS -> Webdesign -> Layout -> ItemView -> ItemViewBasketPreviewList
- CMS -> Webdesign -> Layout -> ItemView -> ItemViewItemToBasketConfirmationOverlay
- mit Webdesign -> links den Mandanten auswählen -> Einstellungen -> Mandanten -> z.B. Standard -> Bestellvorgang -> 3. Bestellschritt von BESTELLEN Kasse auf neu angelegten checkout ändern
- Mit Webdesign -> links den Mandanten auswählen -> Einstellungen -> Mandanten -> z.B. Standard -> Bestellvorgang -> 2. Bestellschritt von KONTO Anmeldung auf neu angelegten login ändern, falls nötig (nicht bei B2B)
- ggf. restliche Routen anpassen / übertragen (gtc/privacy-policy u.s.w.)
Virtualbox Update
20. Oktober 2019
Virtualbox sagt beim Start bescheid, daß neue Version heruntergeladen werden kann => runterladen => in's Download-Verzeichnis wechseln
# Version checken
VBoxManage --version
sudo apt remove virtualbox-6.x
sudo apt update
sudo dpkg -i virtualbox-6.x_XXXXXXXXXXXXXX.deb
# entsprechend der heruntergeladenen Version
Teilstring in Dateinamen ersetzen mit rename
21. Oktober 2019
- unpassender_dateiname.jpg
- noch_ein_unpassender_dateiname.jpg
# -n: noaction - nur testen nichts ändern
rename -n 's/alt/neu/g' *
# 's' für string und 'g' für global: nicht nur den ersten Treffer, sondern ALLE Treffer im Dateinamen
# konkret:
rename 's/unpassender_/treffender_/' *.jpg
- treffender_dateiname.jpg
- noch_ein_treffender_dateiname.jpg
Virtualhost in Apache2
27. Oktober 2019
- alle aktiven virtualhosts anzeigen
ls /etc/apache2/sites-enabled
- lege einen Ordner für die domain an
- passe die Besitzrechte an
- passe die Lese- und Schreibrechte an
- lege in dem neuen Ordner eine index-Datei an
sudo mkdir /var/www/html/example.local
sudo chown $USER:$USER /var/www/html/example.local
sudo chmod -R 755 /var/www/html/example.local
nano /var/www/html/example.local/index.php
{php "Example.local is working!"; php}
- kopiere die Standard-Konfigurationsdatei in /etc/apache2/sites-available/
cd /etc/apache2/sites-available
cp 000-default.conf example.conf
Beachte, daß .dev und .foo nicht mehr funktionieren, da diese wohl von google aufgekauft wurden
- passe die example.conf an, wichtig ist hier eigentlich nur ServerName example.local
{VirtualHost *:80}

        ...

	# However, you must set it for any further virtual host explicitly.
	#ServerName www.example.com

	ServerAdmin webmaster@localhost
	ServerName example.local
	ServerAlias www.example.local
	DocumentRoot /var/www/html/example.local

        ...

        weitere Optionen...

{/VirtualHost}
- dann die Konfigurationsdatei aktivieren und den Apache neu laden
sudo a2ensite example.conf
sudo systemctl reload apache2
- ggf. prüfen mit
ls /etc/apache2/sites-enabled
- auf dem client die /etc/hosts anpassen
sudo nano /etc/hosts
192.168.1.88        example.local
- deaktivieren wäre
sudo a2dissite example.conf
sudo systemctl reload apache2
- bei Änderungen an der Datei genügt ein
sudo systemctl reload apache2
Symfony 4 - das erste Mal
04. November 2019
Voraussetzungen:
- Apache
- Virtualhost (symfony.local)
- Updates und Upgrades
Server vorbereiten:
mkdir /var/www/html/symfony.local
chown $USER:$USER /var/www/html/symfony.local
chmod -R 755 /var/www/html/symfony.local
cd /var/www/html/symfony.local
nano index.php {% write some PHP text %}
Composer im home-Verzeichnis installieren
cd ~
Micro-App anlegen
cd /var/www/html/symfony.local
composer create-project symfony/skeleton my_first_symfony
cd my_first_symfony
composer apache-pack (erstellt die notwendige .htacccess im public-Ordner)
composer require symfony/apache-pack
composer annotations
composer require annotations
Controller anlegen im Projekt unter
my_first_symfony/src/Controller/ArticleController.php
Inhalt ArticleController.php
    {% PHP

namespace App\Controller;

use Symfony\Component\Routing\Annotation\Route;
use Symfony\Component\HttpFoundation\Response;


class ArticleController
{
    /**
     * @Route("/")
     *
     */

    public function index(){
        return new Response("index-seite");
    }

    /**
     * @Route("/show")
     *
     */

    public function foo(){
        return new Response("show-seite");
    }

    /**
     * @Route("/show/ja-is-klar")
     */

    public function bla(){
        return new Response("show/ja-is-klar-seite");
    }

    /**
     * @Route("/show/{slug}")
     */

    public function blub($slug){
        return new Response(sprintf(
            "der Part nach dem slash hinter show: %s", $slug
        ));
    }

    /**
     * @Route("/show/{id}", methods={"GET","POST"})
     *
     */

    public function show($id){
        return new Response($id);
    }
}
github clone vs. pull
31. Januar 2020
verwende clone, wenn das Verzeichnis lokal noch nicht existiert oder du einen sauberen Clon des Repositoys benötigst, beinhaltet auch gleich den den Remote-Pfad (origin)
git clone benutzername@host:/pfad/zum/repositoryName.git
erzeugt im aktuellen Verzeichnis das repositoryName, sonst einfach in das Verzeichnis repositoryName wechseln und dort pullen
Für einen Upload bearbeiteter Dateien müssen die Credentials für das Repository genommen werden!
git init nicht nötig
git config user.email "test@myexample.com"
git config user.name "myName"
danach das übliche
git push -u origin master
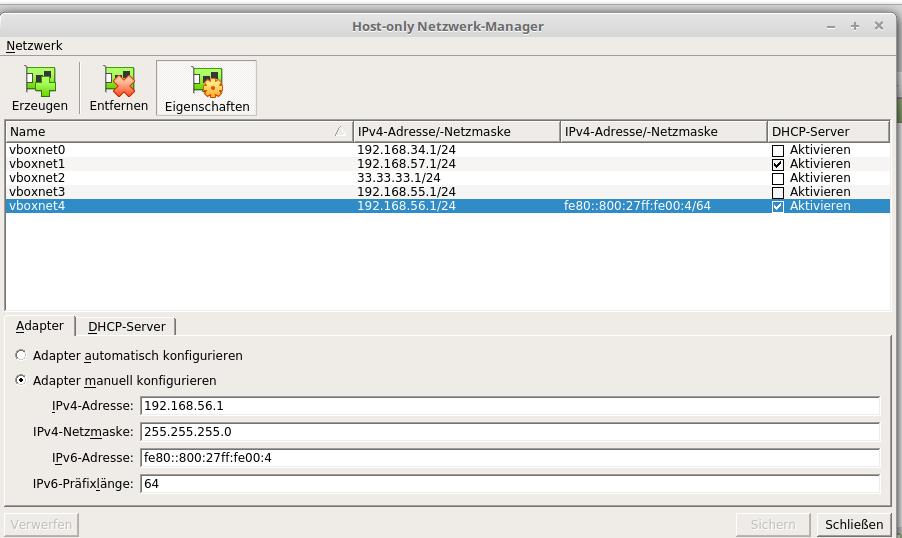
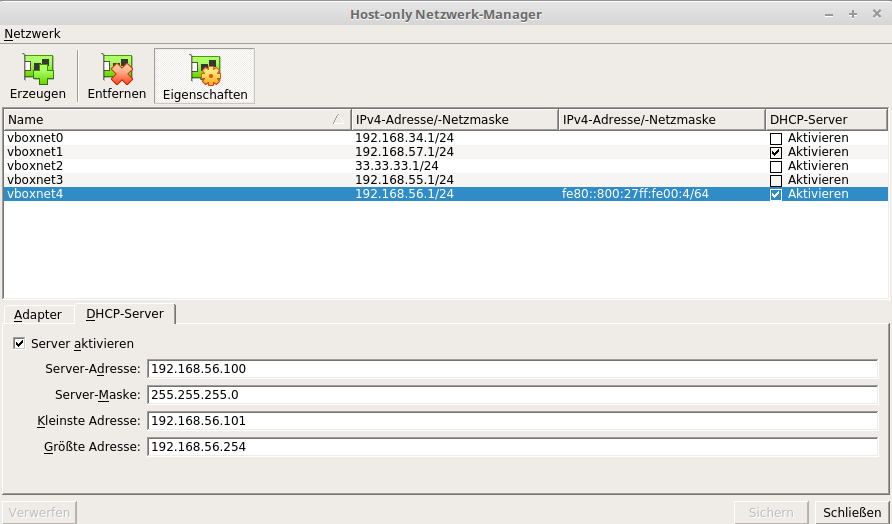
VirtualBox Host-Only-Adaper
07. Februar 2020
VirtualBox unter Cinnamon: Datei->Host-Only Netzwerk-Manager / unter LXDE: Datei->Einstellungen->Netwzerk->Host-only Netzwerk Tab
Adapter-Einstellungen und DHCP-Einstellungen vornehmen, DHCP muss offenbar aktiviert sein
In der VM feste IP vergeben
Bilder
Terminal MySQL User/Datenbank anlegen/löschen/PW ändern
07. Februar 2020
als root anmelden
sudo su
an Datenbank anmelden
mysql
alle DB Benutzer anzeigen lassen
    mysql> SELECT user from mysql.user;
    +------------------+
    | user             |
    +------------------+
    | debian-sys-maint |
    | mysql.session    |
    | mysql.sys        |
    | testuser         |
    | root             |
    +------------------+
    5 rows in set (0.00 sec)
User löschen
DROP USER 'testuser'@'localhost';
User anlegen
    mysql> CREATE USER 'testuser'@'localhost' IDENTIFIED BY 'YOUR_PASSWORD_HERE';
    Query OK, 0 rows affected (0.00 sec)
alle Datenbanken anzeigen lassen
    mysql> SHOW DATABASES;
    +--------------------+
    | Database           |
    +--------------------+
    | information_schema |
    | mysql              |
    | performance_schema |
    | sys                |
    | mytestdb           |
    +--------------------+
    5 rows in set (0.04 sec)
Datenbank löschen
    mysql> DROP DATABASE mytestdb;
    Query OK, 249 rows affected (6.33 sec)
Datenbank anlegen
    mysql> CREATE DATABASE mytestdb;
    Query OK, 1 row affected (0.05 sec)
Benutzer zur Datenbank mytestdb mit PRIVILEGES ALL hinzufügen
    mysql> GRANT ALL PRIVILEGES ON mytestdb.* TO 'testuser'@'localhost';
    Query OK, 0 rows affected (0.00 sec)
Benutzerrechte ausführen
    mysql> flush privileges;
    Query OK, 0 rows affected (0.01 sec)
root abmelden, anmelden als USER testen
    exit;

    mysql -h'localhost' -u'testuser' -p
    Enter password:
    Welcome to the MySQL monitor.  Commands end with ; or \g.
    Your MySQL connection id is ...
    Server version: ...

    Copyright (c) 2000, 2018, Oracle and/or its affiliates. All rights reserved.

    Oracle is a registered trademark of Oracle Corporation and/or its
    affiliates. Other names may be trademarks of their respective
    owners.

    Type 'help;' or '\h' for help. Type '\c' to clear the current input statement.

    mysql>
PW ändern
ALTER USER 'testuser'@'localhost' IDENTIFIED BY 'NeuesPasswort';
P24 Klon nginx
09. April 2020
P24 Klon
Schritt 1: Virtualbox
- virtuelle Maschine anlegen mit 4096MB RAM und 30GiB HDD
- CPU 2 Kerne, Netzwerkbrücke, ubuntu-18.04-server-amd-64.iso
- Hostname darf keinen Punkt enthalten oder https://www.harmswelt.de/index.php/post/5/hostnamen-unter-ubuntu18-04-permanent-aendern
- nur ssh-server zusätzlich auswählen bei der Installation
Schritt 2: System einrichten
- netplan
network:
    version: 2
    renderer: networkd
    ethernets:
      enp0s3:
        dhcp4: no
        addresses: [192.168.XXX.XXX/24]
        gateway4: 192.168.XXX.1
        nameservers:
          addresses: [192.168.XXX.1,194.150.168.168]
- update, upgrade, autoremove
Schritt 3: LEMP Server
- https://www.howtoforge.de/anleitung/wie-man-shopware-mit-nginx-installiert-und-lets-encrypt-auf-ubuntu-1804-lts/
- sudo apt install nginx
- PHP 7.0: Ondrej
- https://tecadmin.net/install-php-7-on-ubuntu/
sudo add-apt-repository ppa:ondrej/php
ENTER
sudo apt-get update
sudo apt-get install php7.0-fpm
- restliche php7.0-Erweiterungen installieren, wie oben im Link vorgeschlagen
sudo apt install php7.0-mysql php7.0-curl php7.0-zip php7.0-gd php7.0-xml php7.0-mbstring
- prüfen
php -m
- neustarten
sudo service php7.0-fpm restart
sudo nginx -t
sudo systemctl reload nginx (.conf neu einlesen) ***ODER*** systemctl restart nginx (runterfahren, hochfahren)
Schritt 4: ioncube
cd /tmp && wget https://downloads.ioncube.com/loader_downloads/ioncube_loaders_lin_x86-64.tar.gz
tar xvfz ioncube_loaders_lin_*.gz
- PHP Erweiterungsverzeichnis finden
php -i | grep extension_dir
# extension_dir => /usr/lib/php/20151012 => /usr/lib/php/20151012
- ioncube-loader in das Verzeichnis kopieren
sudo cp /tmp/ioncube/ioncube_loader_lin_7.0.so /usr/lib/php/20151012/
- ioncube.ini mit Pfad zur zend_extension anlegen
cd /etc/php/7.0
sudo su
echo "zend_extension = /usr/lib/php/20151012/ioncube_loader_lin_7.0.so" > /etc/php/7.0/mods-available/ioncube.ini
exit
- Symlinks zu den mods-available erstellen
sudo ln -s /etc/php/7.0/mods-available/ioncube.ini /etc/php/7.0/cli/conf.d/00-ioncube.ini
sudo ln -s /etc/php/7.0/mods-available/ioncube.ini /etc/php/7.0/fpm/conf.d/00-ioncube.ini
- php7.0-fpm neustarten
sudo systemctl restart php7.0-fpm
- php-Version und Einbindung ioncube prüfen
php -v

#PHP 7.0.33-26+ubuntu18.04.1+deb.sury.org+1 (cli) (built: Mar 20 2020 15:01:06) ( NTS )
#Copyright (c) 1997-2017 The PHP Group
#Zend Engine v3.0.0, Copyright (c) 1998-2017 Zend Technologies
#    with the ionCube PHP Loader + ionCube24 v10.3.9, Copyright (c) 2002-2019, by ionCube Ltd.
#    with Zend OPcache v7.0.33-26+ubuntu18.04.1+deb.sury.org+1, Copyright (c) 1999-2017, by Zend Technologies
Schritt 5: MariaDB
sudo apt install mariadb-server mariadb-client
sudo mysql_secure_installation
sudo su
mysql
CREATE USER 'testuser'@'localhost' IDENTIFIED BY 'YOUR_PASSWORD_HERE';
CREATE DATABASE mytestdb;
GRANT ALL PRIVILEGES ON mytestdb.* TO 'testuser'@'localhost';
FLUSH PRIVILEGES;
Schritt 6: Webserver-Verzeichnis behandeln
sudo usermod -aG www-data USER (abmelden, anmelden!!)
sudo mkdir /var/www/html/shop
sudo chown -R www-data:www-data /var/www/
- eventuell Rechte festlegen (Dateien gehören dann immer der Gruppe www-data)
- Schritt 6 auf webhosterwissen (setgit-Bit)
sudo find /var/www -type d -exec chmod g+s {} +
Schritt 7: Daten holen
- Wartungsmodus
- alle caches löschen
- Datenbank sichern/exportieren
- https://timmehosting.de/datenbank-exportieren-und-importieren-kommandozeile
mysqldump -h 127.0.0.1 -u Benutzername -p --opt Datenbankname > /Verzeichnis/Dateiname.sql
- Files nach /var/www/html
- Beispiel, wenn es direkt vom Hoster gezogen werden soll
rsync -avp -P --exclude=/files/documents/ --exclude=/staging --exclude=/var/cache/production* --exclude=/web/ --exclude=/xxx_useless_xxx SERVER:/VERZEICHNISSE/web/shop/ .
-
sonst einfach rsyncen, Verzeichnisse neu anlegen/beschreibbar machen:
- var (wichtig zum Anfang, sonst Server-Fehler)
- web (wichtig zum Anfang, sonst Server-Fehler)
- files
- media
- engine/Shopware/Plugins/Community
- Datenbank importieren
- https://timmehosting.de/datenbank-exportieren-und-importieren-kommandozeile
mysql -h 127.0.0.1 -u Benutzername -p Datenbankname < /Verzeichnis/Dateiname.sql
- s_core_shops anpassen, dabei SSL überall abschalten (secure = 0), base_path NICHT SETZEN !!!
SELECT * FROM s_core_shops\G

*************************** 1. row ***************************
                  id: 1
             main_id: NULL
                name: Deutsch
               title: NULL
            position: 0
                host: www.packing24.de
           base_path: /shop
            base_url: NULL
               hosts: www.packing24.de packing24.de
              secure: 1
         template_id: 43
document_template_id: 43
         category_id: 3
           locale_id: 1
         currency_id: 1
   customer_group_id: 1
         fallback_id: NULL
      customer_scope: 0
             default: 1
              active: 1
1 row in set (0.00 sec)

UPDATE s_core_shops SET host = '192.168.XXX.XXX', base_path = '', hosts = '192.168.XXX.XXX', secure = 0 WHERE id = 1;
SELECT * FROM s_core_shops\G

*************************** 1. row ***************************
                  id: 1
             main_id: NULL
                name: Deutsch
               title: NULL
            position: 0
                host: 192.168.XXX.XXX
           base_path:
            base_url: NULL
               hosts: 192.168.XXX.XXX
              secure: 0
         template_id: 43
document_template_id: 43
         category_id: 3
           locale_id: 1
         currency_id: 1
   customer_group_id: 1
         fallback_id: NULL
      customer_scope: 0
             default: 1
              active: 1
1 row in set (0.00 sec)
Schritt 8: NGINX konfigurieren
sudo mv /etc/nginx /etc/nginx.original
sudo git clone https://github.com/bcremer/shopware-with-nginx.git /etc/nginx/
- Konfigurationen anpassen
***example.com.conf***

server {
    listen 80;
    #listen 443 ssl http2;

    server_name 192.168.XXX.XXX;
    root /var/www/html/shop;

    ## Access and error logs.
    access_log /var/log/nginx/example.com.access.log;
    error_log  /var/log/nginx/example.com.error.log;

    set $shopware_env 'production';
    set $fpm_upstream php-fpm;

    ## Server certificate and key.
    #ssl_certificate      ssl/example.com.crt;
    #ssl_certificate_key  ssl/example.com.key;

    #ssl_session_cache   shared:SSL:10m;
    #ssl_session_timeout 10m;

    ## see: https://github.com/cloudflare/sslconfig
    #ssl_protocols             TLSv1 TLSv1.1 TLSv1.2;
    #ssl_ciphers               EECDH+AES128:RSA+AES128:EECDH+AES256:RSA+AES256:EECDH+3DES:RSA+3DES:EECDH+RC4:RSA+RC4:!MD5;
    #ssl_prefer_server_ciphers on;

    ## Include shopware configuration.
    include global/shopware.conf;
}

sudo ln -s /etc/nginx/sites-available/example.com.conf /etc/nginx/sites-enabled/


***upstream.conf***

## Upstream to abstract backend connection(s) for PHP.
upstream php-fpm {
    server unix:/var/run/php/php7.0-fpm.sock;
    server 127.0.0.1:9000;

    ## Create a backend connection cache.
    keepalive 32;
}

sudo chown -R www-data:www-data /var/www/
sudo nginx -t
sudo systemctl reload nginx (.conf neu einlesen) ***ODER*** systemctl restart nginx (runterfahren, hochfahren)
Schritt 9: Virtuelle URL
- virtuelle URL im Backend eintragen: /shop
Was mir sonst noch einfällt
sudo bin/console sw:cache:clear
cat /var/log/nginx/example.com.access.log
cat /var/log/nginx/example.com.error.log
ll /run/php/
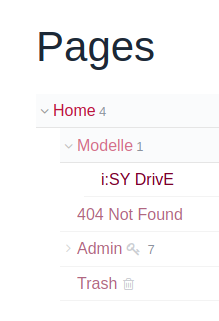
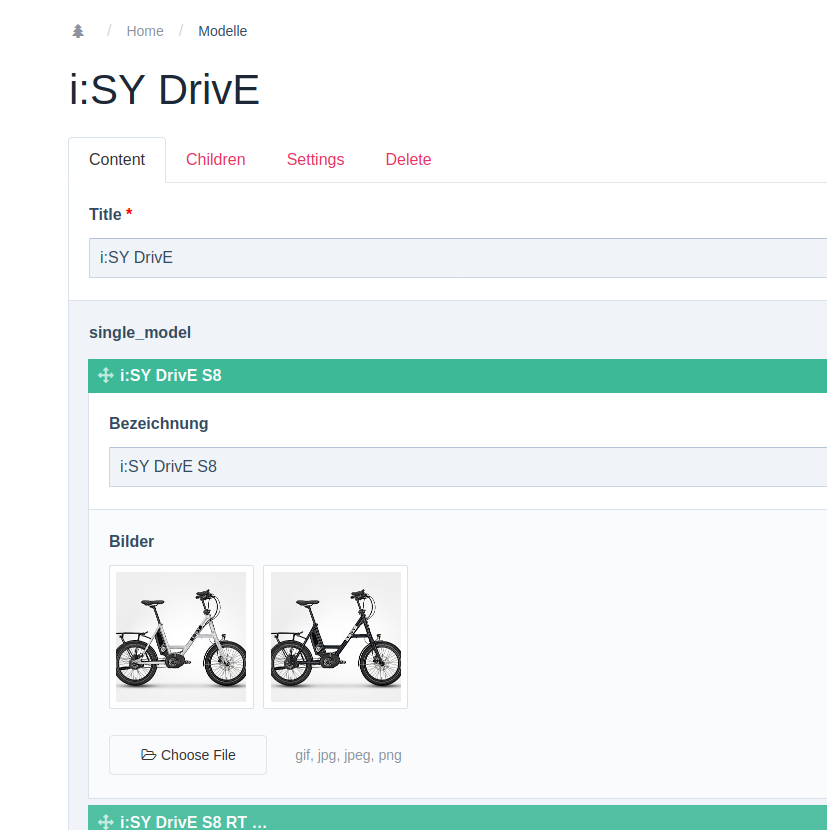
Processwire Daten aus Repeater von Kategorie holen
18. Juni 2020
Aufbau der Kategorien:
- - HOME
-- Kategorie
--- Subkategorie mit Repeater, darin z.B. Beschreibung (Titel) und Bilder
Daten finden anhand des Template-Namens:
foreach($pages->find('template=NAME_DES_TEMPLATES') as $test) {
     foreach($test as $t){
        echo $t->beschreibung;
        foreach($t->images as $i){
            echo $i->url;
        }
    }
}
Bilder
Docker Installation Linux Mint 18.2 Sonya (Ubuntu Xenial)
26. Juni 2020
https://docs.docker.com/engine/install/debian/
sudo apt-get update

sudo apt-get install \
    apt-transport-https \
    ca-certificates \
    curl \
    gnupg-agent \
    software-properties-common

curl -fsSL https://download.docker.com/linux/debian/gpg | sudo apt-key add -
Fingerprint abgleichen
sudo apt-key fingerprint 0EBFCD88
Repository anlegen, bei Mint lsb_release -cs durch xenial ersetzen
sudo add-apt-repository "deb [arch=amd64] https://download.docker.com/linux/ubuntu xenial stable"
docker-ce installieren
sudo apt update
sudo apt install docker-ce docker-ce-cli containerd.io
den User zur Gruppe docker hinzufügen
sudo usermod -aG docker USERNAME
in die Gruppe docker wechseln ohne an- und abmelden
newgrp - docker
Docker Apache PHP MariaDB für Processwire
03. Juli 2020
# Ordner für Webinhalte und Datenbankordner anlegen
mkdir /PFAD/ZUM/ORDNER/
mkdir /PFAD/ZUM/DATENBANKORDNER/

# eigenes Netzwerk kreiren
docker network create my-network
docker network ls

# MariaDB pullen
# Environment Variables übergeben
# starten
docker container run -ti --name mymariadb -h mymariadb --net my-network -v  /PFAD/ZUM/DATENBANKORDNER/:/var/lib/mysql -e MYSQL_ROOT_PASSWORD=root -e MYSQL_DATABASE=pw_database -e MYSQL_USER=testuser -e MYSQL_PASSWORD=geheim mariadb:10.3

# Datei in /PFAD/ZUM/ORNER/ legen
nano index.php
# phpinfo();
# oder direkt mal die Abfrage einbauen
$dbhost = 'IP.DES.DB.CONTAINERS:3306';
$dbuser = 'testuser';
$dbpass = 'geheim';
$db = 'pw_database';

try {
  $conn = new PDO("mysql:host=$dbhost;dbname=pw_database", $dbuser, $dbpass);
  // set the PDO error mode to exception
  $conn->setAttribute(PDO::ATTR_ERRMODE, PDO::ERRMODE_EXCEPTION);
  echo "Connected successfully";
} catch(PDOException $e) {
  echo "Connection failed: " . $e->getMessage();
}

# Apache mit PHP 7.2 pullen
# Verzeichnis einbinden
# auf Port 8080 starten
# pdo_mysql mitinstallieren
docker container run -ti --name myapache -h myapache --net my-network -p 8000:80 -v /PFAD/ZUM/ORDNER/:/var/www/html/ php:7.2-apache bash -c "docker-php-ext-install pdo_mysql gd; apache2-foreground"

# eventuell adminer
docker container run -ti --name myadminer -h myadminer --net my-network -p 8080:8080 adminer:4.7
Docker Processwire
04. Juli 2020
docker container run -ti --name pw -h pw --net my-network -p 8002:80 -v /PFAD/ZUM/PW-ORDNER/:/var/www/html/ php:7.2-apache bash -c "docker-php-ext-install mysqli pdo_mysql gd zip; apache2-foreground"
weitere Optionen:
bcmath bz2 calendar ctype curl dba dom enchant exif fileinfo filter ftp gd gettext gmp hash iconv imap interbase intl json ldap mbstring mysqli oci8 odbc opcache pcntl pdo pdo_dblib pdo_firebird pdo_mysql pdo_oci pdo_odbc pdo_pgsql pdo_sqlite pgsql phar posix pspell readline recode reflection session shmop simplexml snmp soap sockets sodium spl standard sysvmsg sysvsem sysvshm tidy tokenizer wddx xml xmlreader xmlrpc xmlwriter xsl zend_test zip
Mint LXC/LXD
11. August 2020
sudo apt update && sudo apt upgrade -y

/*nur, wenn snap erforderlich */
//sudo apt install snapd
//sudo snap install lxd
/* sonst einfach nur */

sudo apt install lxd
sudo usermod -aG lxd USERNAME
Ausloggen/Einloggen/Neustart oder
newgrp lxd
initialisieren
lxd init
Manchmal ist die Sprache auf deutsch eingestellt (lxc Abbild list), dann einfach die Datei umbenennen
https://github.com/lxc/lxd/issues/7864
sudo mv /usr/share/locale-langpack/de/LC_MESSAGES/lxd.mo /usr/share/locale-langpack/de/LC_MESSAGES/lxd.mo.bak
Send-Only SMTP Server mit postfix
25. November 2020
sudo apt update
sudo apt install mailutils
- Internet Site wählen
- (sudo dpkg-reconfigure postfix) falls nicht angezeigt wird
- bspw. eintragen: mail-test.lxd
sudo nano /etc/postfix/main.cf

. . .
mailbox_size_limit = 0
recipient_delimiter = +
inet_interfaces = all
. . .
ändern in
. . .
mailbox_size_limit = 0
recipient_delimiter = +
inet_interfaces = loopback-only
. . .
Domain Namen anpassen/eintragen, falls nicht automatisch hinterlegt
. . .
mydestination = $myhostname, YOUR_DOMAIN localhost.com, , localhost
. . .
wird z.B. zu
. . .
mydestination = $myhostname, mail-test.lxd, localhost.lxd, , localhost
. . .
Verschlüsselung aktivieren
smtp_tls_security_level = may
ändern in
smtp_tls_security_level = encrypted
Der header sollte dann folgendes enthalten
Received: from Meinserver (meine-reverse-dns [Meine IP])
by Derserver (Postfix) with ESMTPSA id 0E523340030E
for
Neustart postfix
After modifying main.cf, be sure to run 'systemctl reload postfix'.
testen
echo "This is the body of the email" | mail -s "This is the subject line" EMPFAENGER@EMAIL.NET
Option FROM, hier wird der angegebene Hostname angehängt, also z.B. sender@mail-test.lxd
echo "This is the body of the email" | mail -s "This is the subject line" -a FROM:sender EMPFAENGER@EMAIL.NET
oder für eine vollständig angehängte E-Mail-Adresse
echo "This is the body of the email" | mail -s "This is the subject line" -a FROM:sender@ANDERE_EMAIL.NET EMPFAENGER@EMAIL.NET
LXC Backup und Restore
24. Februar 2021
lxc list
+------------------------+---------+------+------+------------+----------------+
|          NAME          | STATUS  | IPV4 | IPV6 |    TYP     | SCHNAPPSCHÜSSE |
+------------------------+---------+------+------+------------+----------------+
| sound                  | STOPPED |      |      | PERSISTENT | 0              |
+------------------------+---------+------+------+------------+----------------+

lxc publish sound --alias sound-image
lxc image list
+---------------------------+---------------+--------+------------------------------------+--------+-----------+------------------------------+
|           ALIAS           | FINGERABDRUCK | PUBLIC |            BESCHREIBUNG            |  ARCH  |   GRÖßE   |        HOCHLADEDATUM         |
+---------------------------+---------------+--------+------------------------------------+--------+-----------+------------------------------+
| sound-image               | b0bbea15b6d0  | Nein   |                                    | x86_64 | 462.06MB  | Jan 1, 1970 at 0:00am (UTC)  |
+---------------------------+---------------+--------+------------------------------------+--------+-----------+------------------------------+

// erstellt ein tar.gz, keine Endung angeben!
lxc image export sound-image /PATH/TO/sound-image
Image exported successfully!

ls -la /PATH/TO/ | grep sound-image
-rw-rw-r--  1 nobody nobody 477997725 Jan 01 00:00 sound-image.tar.gz

// Restore
lxc image import sound-image.tar.gz --alias sound-image

// Starten
lxc launch sound-image sound
Installation und Einrichtung MySQL Datenbank mit Fernzugriff
12. März 2021
### First install ###
sudo apt install mysql-server-5.7
systemctl status mysql
sudo mysql_secure_installation
sudo mysql -u root -p

### external access ###
nano /etc/mysql/mysql.conf.d/mysqld.cnf
bind-address            = 0.0.0.0
systemctl restart mysql

### Preparing ###
CREATE DATABASE db;
CREATE USER 'User'@'ip_address' IDENTIFIED BY 'password;
GRANT ALL PRIVILEGES ON db.* TO 'User'@'ip_address';
flush privileges;

### Check ###
SELECT user,authentication_string,plugin,host FROM mysql.user;

+------------------+-------------------------------------------+-----------------------+---------------+
| user             | authentication_string                     | plugin                | host          |
+------------------+-------------------------------------------+-----------------------+---------------+
| root             |                                           | auth_socket           | localhost     |
| mysql.session    | *THISISNOTAVALIDPASSWORDTHATCANBEUSEDHERE | mysql_native_password | localhost     |
| mysql.sys        | *THISISNOTAVALIDPASSWORDTHATCANBEUSEDHERE | mysql_native_password | localhost     |
| debian-sys-maint | *THISISNOTAVALIDPASSWORDTHATCANBEUSEDHERE | mysql_native_password | localhost     |
|             User | *THISISNOTAVALIDPASSWORDTHATCANBEUSEDHERE | mysql_native_password | ip_address    |
+------------------+-------------------------------------------+-----------------------+---------------+

### (Re-)Install ###
DROP DATABASE db;
CREATE DATABASE db;
GRANT ALL PRIVILEGES ON db.* TO 'User'@'ip_address';
flush privileges;
Komplettinstallation LAMP + Shopware 6 in LXC-Container
18. April 2021
lxc launch ubuntu:20.04 knorke-sw6-18042021
lxc exec knorke-sw6-18042021 bash
adduser peejay
usermod -aG sudo peejay
usermod -aG ssh peejay
usermod -aG www-data peejay
su peejay
sudo nano /etc/ssh/sshd_config
sudo systemctl restart ssh
sudo systemctl restart sshd
sudo apt update && sudo apt dist-upgrade -y
sudo apt install software-properties-common
sudo apt autoremove
sudo locale-gen de_DE.UTF-8
sudo update-locale LANG=de_DE.UTF-8
sudo add-apt-repository -y ppa:ondrej/apache2
sudo apt update && sudo apt dist-upgrade -y
sudo apt install apache2 -y
sudo apachectl -v
sudo apt install libapache2-mod-php7.4
sudo a2enmod rewrite
sudo systemctl restart apache2
sudo nano /etc/php/7.4/apache2/php.ini
sudo systemctl reload apache2
sudo apt update && sudo apt dist-upgrade -y
sudo apt install -y mysql-server mysql-client
mysql -V
sudo add-apt-repository -y ppa:ondrej/php
sudo apt update && sudo apt dist-upgrade -y
sudo apt install -y php7.4 php7.4-{cli,fpm,common,curl,gd,intl,json,mbstring,mysql,xml,zip}

# Creating config file /etc/php/7.4/fpm/php.ini with new version
# NOTICE: Not enabling PHP 7.4 FPM by default.
# NOTICE: To enable PHP 7.4 FPM in Apache2 do:
# NOTICE: a2enmod proxy_fcgi setenvif
# NOTICE: a2enconf php7.4-fpm
# NOTICE: You are seeing this message because you have apache2 package installed.

php -v

sudo a2enmod proxy_fcgi setenvif
sudo systemctl restart apache2
sudo apachectl -M

# https://getcomposer.org/download/
cd ~
sudo mv composer.phar /usr/local/bin/composer
sudo chown -R root:root /usr/local/bin/composer
composer --version
sudo apt install nodejs npm
node -v
npm -v
git --version


+++++++++++++

sudo nano /etc/hosts (127.0.0.1 shopware6.localdomain)
sudo mkdir -p /var/www/html/shopware6
sudo chown -R $USER:$USER /var/www/html/shopware6
# später? sudo chown -R www-data:www-data /var/www/html/shopware6
sudo chmod -R 755 /var/www/html/shopware6
sudo cp /etc/apache2/sites-available/000-default.conf /etc/apache2/sites-available/shopware6.localdomain.conf
sudo nano /etc/apache2/sites-available/shopware6.localdomain.conf
+VirtualHost *:80+
        ServerName shopware6.localdomain
        ServerAdmin name@knorke.de
        DocumentRoot /var/www/html/shopware6/public
        Include /etc/apache2/conf-available/php7.4-fpm.conf
        ErrorLog ${APACHE_LOG_DIR}/shopware6.localdomain--error.log
        CustomLog ${APACHE_LOG_DIR}/shopware6.localdomain--access.log combined

        +Directory /var/www/html/shopware6+
                Options -Indexes +FollowSymLinks +MultiViews
                AllowOverride All
                Require all granted
        +/Directory+
+/VirtualHost+
sudo a2ensite shopware6.localdomain
sudo apachectl configtest
sudo systemctl reload apache2

sudo mysql -u root
CREATE DATABASE shopware6;
CREATE DATABASE shopware6_test;
CREATE DATABASE shopware6_e2e;
CREATE USER 'shopware6_dbuser'@'localhost' IDENTIFIED BY 'shopware6_dbpassword';
GRANT ALL PRIVILEGES ON shopware6.* TO 'shopware6_dbuser'@'localhost';
GRANT ALL PRIVILEGES ON shopware6_test.* TO 'shopware6_dbuser'@'localhost';
GRANT ALL PRIVILEGES ON shopware6_e2e.* TO 'shopware6_dbuser'@'localhost';
FLUSH PRIVILEGES;
set global log_bin_trust_function_creators=1;
quit

cd /var/www/html
git clone https://github.com/shopware/development.git shopware6
cd /var/www/html/shopware6
./bin/setup


# bei Problemen mit slash am Ende
# sudo nano /etc/apache2/sites-available/shopware6.localdomain.conf
        +Directory /var/www/html/shopware6+
                DirectorySlash On
                Options -Indexes +FollowSymLinks +MultiViews
                AllowOverride All
                Require all granted
        +/Directory+
eigenes (v40)-git-repository
15. Dezember 2021
# auf dem Server- mkdir git-repos
- cd git-repos/
auf v40 ist das Verzeichnis bereits vorhanden (/home/git/)
### das Repo-Verzeichnis anlegen und als bare initialisieren
- mkdir repo1.git
- cd repo1.git/
- git init --bare
# auf dem Client in einem Verzeichnis
- git clone /PATH/TO/DESTINATION/repo1.git/ (klont ein leeres Verzeichnis)
- cd repo1.git/
- git config user.name "xxx"
- git config user.email "xxx@xxx.xx"
### im neuen Verzeichnis arbeiten
- touch test
- git add .
- git commit -m "xxx"
- git push
- github repository aus dem Bestand klonen
- github ssh-keys, auch für mehrere Accounts
- Plenty checkout
- Virtualbox Update
- Teilstring in Dateinamen ersetzen mit rename
- Virtualhost in Apache2
- Symfony 4 - das erste Mal
- github clone vs. pull
- VirtualBox Host-Only-Adaper
- Terminal MySQL User/Datenbank anlegen/löschen/PW ändern
- P24 Klon nginx
- Processwire Daten aus Repeater von Kategorie holen
- Docker Installation Linux Mint 18.2 Sonya (Ubuntu Xenial)
- Docker Apache PHP MariaDB für Processwire
- Docker Processwire
- Mint LXC/LXD
- Send-Only SMTP Server mit postfix
- LXC Backup und Restore
- Installation und Einrichtung MySQL Datenbank mit Fernzugriff
- Komplettinstallation LAMP + Shopware 6 in LXC-Container
- eigenes (v40)-git-repository
Submenu for navigation on the (parent)page:
No wordpress needed, just made with the brilliant PROCESSWIRE CMS
Diese Webseite ist noch im Aufbau!